For most of us, form goes well before we can’t actually train any more. One of the accusations leveled at CrossFit is that it involves using Olympic lifts as conditioning tools and thus endangers its athletes, because their form falls apart when they use complex technical lifts for conditioning.
So how can we program for this?
There are some great tools in gyms, like Prowlers or kettlebells, and barbell complexes, body weight circuits and rope climbs are great too. If you already swear by one of these, that’s great. But there’s something even better, even easier to implement, and even more effective than any of them. Something you can throw in after your kettlebell work or your barbell complexes. Something that’s easy on the central nervous system, doesn't require a huge amount of skill (though as we’ll see, it does take some) and that produces results fast.
Weighted carries.
A weighted carry is exactly as simple as it sounds. You carry a weight. It is Forrest Gump simple. It requires stabilization, strength and endurance – the second two are factors in any good conditioning program but a conditioning program that improves posture and bulletproofs endangered areas like the hips, shoulders, knees and elbows? Who wouldn't want a piece of that?
Weighted carries require you to stabilize a weight and the structure of your own body while you walk.
If you ‘creep’ – sink under the weight to escape it – it will chase you right down to the ground if you let it.
Most people figure out early that holding good, braced posture is the easiest way to carry something that heavy and that lesson gets passed on into everyday life. You’ll find you stand better. Your lifts will go up as your postural muscles get stronger. And your conditioning will go through the roof.
If you’re not really a strength athlete or if you want a fast, simple way to get fitter and stronger… folks, this is it. If this was all the strength training you did you’d be ahead of the game.
How it’s Done:
1: Pick up weight.
2: Walk.
Read More: Light Weights, High Reps Vs. Heavy Weights, Low Reps
Ahem. There is more to it than that. One of the major virtues of a weighted carry is that it forces you to maintain good posture while the weight tries to convince you otherwise. You won’t get those benefits if you curl up and stagger.
Use one of the variations laid out below to get the most from your weighted carry training.
How To Do A Loaded Carry
There are six basic ways to do a weighted carry. They are:
Waiters’ walks
Kettlebells are especially good for this. Lock your shoulder blade in position with your lat and keep your hips and shoulders square and your chest inflated. Brace your core, as if you’re about to be punched. If you find overhead holds aggravate your anterior pelvic tilt, try to push your tailbone toward the floor and inflate your chest as you walk. Take normal strides and do it for distance. Two to four sets of 100 yards is two to four times too much for most people…
Consciously fire your lats and traps to lock that supporting arm in place with these.
Racked Walks
Walk with the weight in the racked position. If it’s a barbell, rack it like an O-lift. If it’s a kettlebell rack it like you were going to press it overhead. You can ‘baby hold’ a sandbag, or hold it in a Zercher hold, or even rack it one armed like a kettlebell if a core of steel is required.
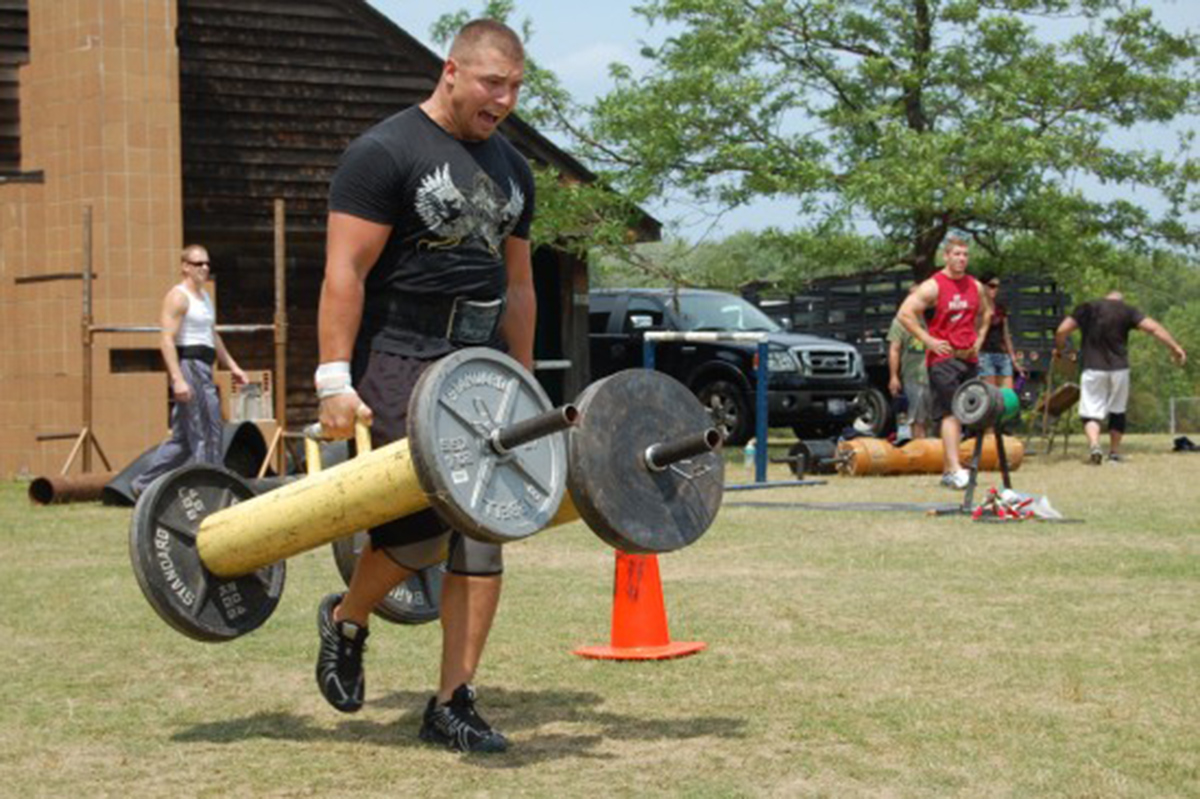
Farmers’ Walks
Hold the weight at one side, at arm’s length. This is the one that allows you to carry the most weight and as such it is in many ways the most punishing and the most effective.
Some gyms have specific farmer's walk bars. If not, you can use anything that doesn't drag on the ground. Using only one weight is sometimes called a suitcase carry. Be careful of your feet doing farmer's walks.
Sumo Walks
Hold a weight in front of you, hanging down at arms’ length. This is a good one for kettlebells and sandbags, though a weight disc works fine too. Don’t bend your arms when it gets too much; brace, stand and walk, letting your back do the work.
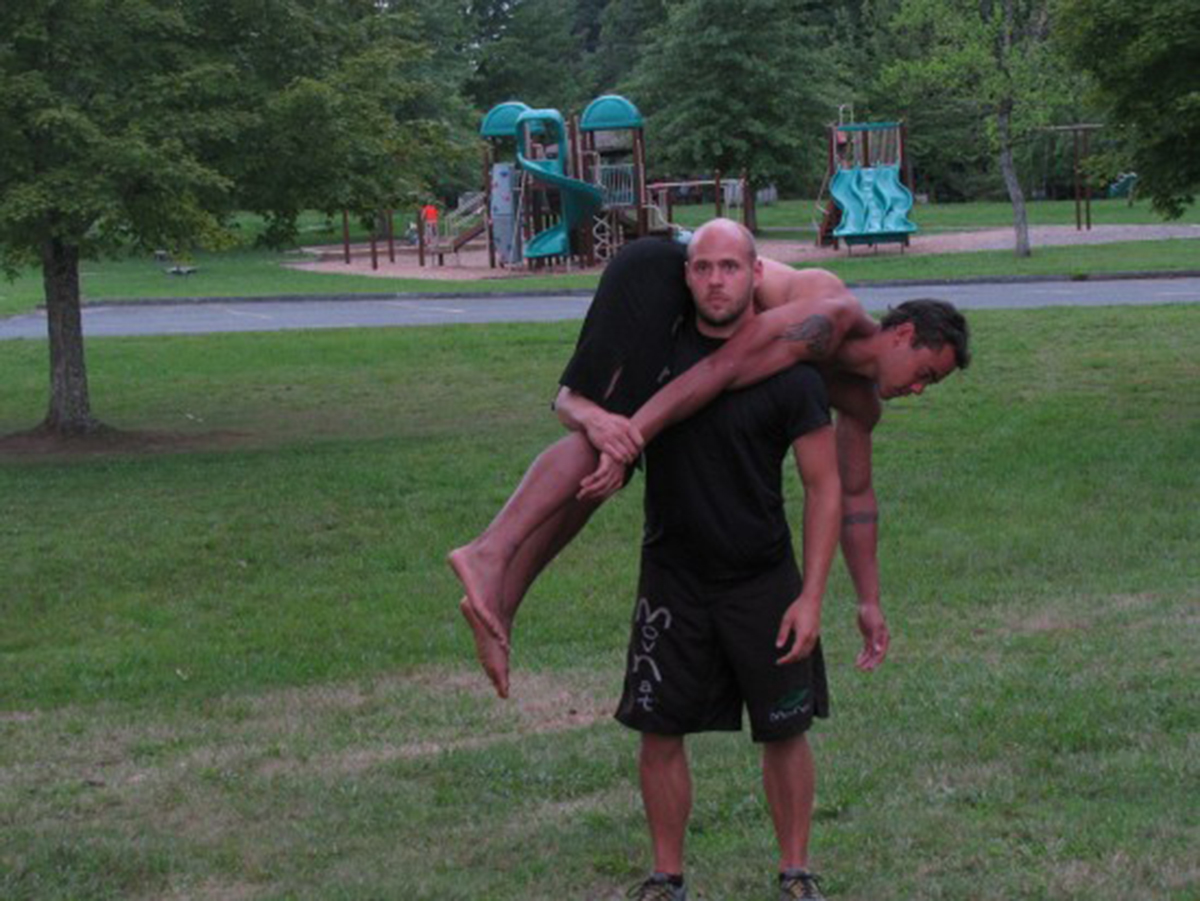
Fireman’s Carries
You can’t really do these with a dumbbell. But you can do them with a training partner who’s about your weight, or a heavy bag, or a sandbag, or a gym bag full of laundry. The requirement to brace against the load on one shoulder immobilizes the chest and makes the abdomen and diaphragm work harder to breathe. Add in a few fireman's lifts and a few squats and you have a session that borders on cruel and unusual punishment - but that anyone can learn pretty much immediately!
Bear Hug Carry
Once again, not too effective with a barbell, but can be done with anything you can hug. Get a nice big sandbag and learn all about 'breathing behind the armor' and bracing with this classic and challenging move.
To make this tougher, try not letting your hands meet. That will mean you'll have to use your upper back the whole time to hold the bear-hug position.
Try for sets of fifty to a hundred yards with each of these. You don’t need many sets. If you can do more than four the weight is too light.
Consider adding in some extra tricks. Mix and match between the methods outlined above. For instance, try doing a farmer's walk with one hand and a waiter's walk with the other. The pattern of strain across your upper back will be horrible, but the next time you bench, overhead press or carry the shopping you'll remember it with gratitude!
Alternatively, you could mix in a time factor.Loaded carries against the clock are a pretty extreme form of torture, but they're also a good way to cram in a lot of work into little time, building fearsome mental toughness at the same time. My personal favorite is to crossbreed the weighted carry with that other no-nonsense conditioning tool of champions: the hill sprint.
When you're doing your carries, try to keep your whole body tight, erect and braced. Brace your core and glutes, keep your chest high and your shoulders back and engage your lats and traps so the strain isn't being taken solely by the smaller muscles of your shoulders. Breathe evenly, slowly and strongly, and concentrate on the next step.
Read More: Planning A Yearly Weight Training Cycle
And how long would four sets of 100 yards take? Including a 2-3 minute rest between each set, between fifteen and twenty minutes. Not a lot of time to give up to get such a great result!
- Photo courtesy of stu_spivack by Flickr : www.flickr.com/photos/stuart_spivack/4873763009/
- Photo courtesy of Kerry by Flickr : www.flickr.com/photos/90616144@N00/7744399766/
Your thoughts on this