Table of Contents
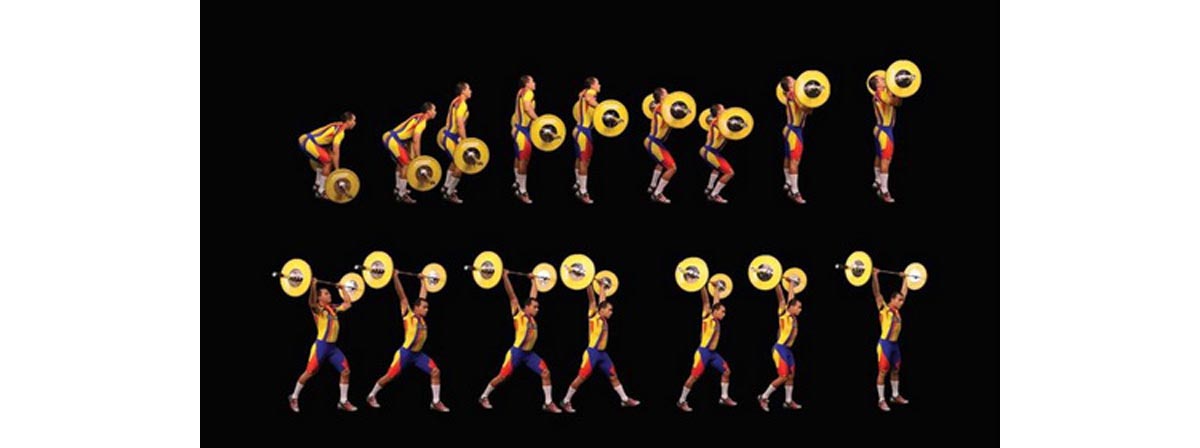
There’s really four stages to a power clean:
1: the beginning, before you move the bar at all
2: the first pull, to about mid-thigh
3: the second pull, to about chest height
4: the catch and rack
Using terms you’re not familiar with can make ideas seem stranger than they are: ‘catch and rack’ isn’t some specialized, esoteric move, it just means catching the bar on your chest in a certain position.
The beginning, before you move the bar at all
Begin by standing as if you were about to deadlift the bar. You need a moderate squat stance – a wide powerlifter’s one isn’t great for most people here, though if you’re experienced and it’s working for you, keep on. Keep your back straight and bend at the hips to reach for the bar. Use your arms like ropes. Remember, tight back, loose arms. Arch your whole back slightly and retract your shoulder blades a little. Hold the bar with your hands about shoulder width apart, and with your insteps under the bar. Feel a line of tension running from your heels, up your calves and hamstrings to your back and to your shoulders. That’s the posterior chain, the interlocking series of muscles that power the power clean. The power most of your other movements too, so get a big power clean and see yourself get functionally stronger!
The first pull, to about mid-thigh
The first pull is very like a deadlift. Start the movement by driving the floor away with your heels and tightening your butt. It’s a hip hinge and it’s largely powered by hip extensors. Where it differs from a deadlift is that it needs to accelerate. Don’t make the beginner’s mistake of trying to snatch the bar off the floor fast. Start slow and then quickly accelerate to get speed and power. At this point it’s a fast deadlift. When this phase of the pull is completed the bar should be level with your thighs, your hips only slightly flexed and the bar still moving upwards – and still accelerating.
The second pull, to about chest height
The second pull needs to accelerate even more. Tense your glutes to fully extend your hips and allow your back to arch backwards as you come up on your toes with your knees straight. Imagine you’re throwing the barbell upwards. At this point your arms should pull backwards with your elbows tracking behind your body and out and your forearms level with the floor.
The catch and rack
Now to complete the lift. You’re going to catch the barbell in the racked position. That means resting the bar on your upper chest just under your collarbones with your hands under the bar palm up, and your forearms almost parallel with the ground. Try this: put your thumbs on the crease between your shoulder and your chest, with your pals facing away from you. Now raise your elbows with the tips of your thumbs no higher than your collarbones til your elbows are straight out in front of you. That’s the rack position.
If you can’t get into it, don’t worry, that’s not that unusual. It takes some practice. The best way to practice for the rack is to use a squat cage or have a friend load you (carefully!) with a light bar in the rack position, and do some weighted carries in the rack position. Then you’ll have developed some of the strength and flexibility you’ll need to power clean well. But sometimes it’s just a case of practice makes perfect.
If you’re unfamiliar with the lift, start with a light (not too light) weight
I’d start with a light weight if you’re unfamiliar with the lift, but not too light: say 10kg or a quarter of your bodyweight, whichever is heavier. And practice in slow motion with a broomstick or an empty bar too. Make it part of your warmup.
When you’re deciding where to put power cleans in a session, the answer will pretty much always be: first.
– say you’ve done a session of your sport and you’re getting some weights in afterwards – or really technical super-fast lifts like snatches. Otherwise, it’s power, then strength, then cardio, then stretch, then shower.
At the kind of weights you should work up to power cleaning – and power cleaning your body weight isn’t an unapproachable feat – you shouldn’t really do them more than two or three times a week. They’re just too demanding. But put some serious effort in when you do them, for maybe 2 or 3 sets of 5, and you’ll see some serious results!
- Photo courtesy of United States Navy by Wikimedia Commons : commons.wikimedia.org/wiki/File:US_Navy_070118-N-8483H-002_Storekeeper_1st_Class_Jeremy_Watkins_prepares_himself_for_Naval_Station_Rota's_Spring_Physical_Readiness_Test_through_strength_tr
- Photo courtesy of Evdcoldeportes by Wikimedia Commons : commons.wikimedia.org/wiki/File:EVD-pesas-056.jpg
Your thoughts on this