Basics of training at home:
1. SET YOUR FITNESS GOALS
The first thing to do is set your fitness goals. These, however, need to be realistic and time-bound. No point thinking 'I am going to lose 30 pounds in 8 weeks' time and then ending up getting disappointed. Smaller targets usually work better. And, you'd be surprised how much these smaller goals add up over eventually.
2. STAY MOTIVATED
To stay motivated - here's what can really help you. Pick an important event in your life; for instance, if you've got your birthday coming up in a couple of month's time, plan to drop a dress size till that time (or pack on a few pounds of lean muscle).
3. PUT THOUGHT INTO YOUR EXERCISE PLAN
The worst mistake you can do is to pick someone else's exercise plan - it simply won't work for you. Your exercise plan needs to be individualized towards your fitness goals. If you are planning on running the 100 metres under 12 seconds this summer, it won't help to follow someone's bench press routine! Also, ALWAYS SELECT EXERCISES which are more likely to get you there.
3. TRAIN AT HOME
Training at home can...
Basics of training at home:
1. SET YOUR FITNESS GOALS
The first thing to do is set your fitness goals. These, however, need to be realistic and time-bound. No point thinking 'I am going to lose 30 pounds in 8 weeks' time and then ending up getting disappointed. Smaller targets usually work better. And, you'd be surprised how much these smaller goals add up over eventually.
2. STAY MOTIVATED
To stay motivated - here's what can really help you. Pick an important event in your life; for instance, if you've got your birthday coming up in a couple of month's time, plan to drop a dress size till that time (or pack on a few pounds of lean muscle).
3. PUT THOUGHT INTO YOUR EXERCISE PLAN
The worst mistake you can do is to pick someone else's exercise plan - it simply won't work for you. Your exercise plan needs to be individualized towards your fitness goals. If you are planning on running the 100 metres under 12 seconds this summer, it won't help to follow someone's bench press routine! Also, ALWAYS SELECT EXERCISES which are more likely to get you there.
3. TRAIN AT HOME
Training at home can have pluses and minuses:
On the positive side: you can train without the fear of 'looking lousy' - which is the one thing that stops most people from learning new skills (or exercises) at the gym. Also, you can really focus when training at home - there is no pretense. You wouldn't even need to worry if you are sweating too much in the crotch!
Train at home and you stand to know the real meaning of 'TRAIN LIKE NO ONE'S WATCHING'.
On the down side: If you are a bodybuilder or an athlete looking to strengthen during off season, you just can't do without weights! Having said that, you can still buy a few weights for resistance training. Garage gyms have become quite a craze in recent times - most CrossFitters are beginning to realise the importance of having your own garage gym!
4. EQUIPMENT YOU'D NEED TO BUY
If money is a concern, you can keep the equipment down to minimum. If you are looking to lose fat or get fitter, believe me you won't need to invest too much on fancy equipment. And, whatever you do - don't go and buy a treadmill - its costs a lot and chances are, you won't be using it after a few weeks!
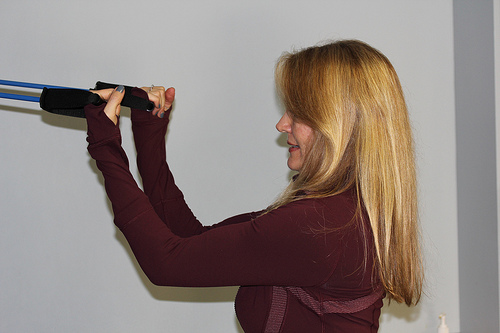
Things that you should buy are - resistance bands or tubes, ankle weights, some light dumbbells, plyos boxes (optional) and a medicine or stability ball. Also, you'd need to get a pull-up bar installed (if you haven't already got one in the house).
Resistance tubes are a must; there is a lot you can do with these - exercises like the standing bicep curls shown in the slide are just an example.
RIGHT, now that we've got the fitness goals, exercise plan and equipment sorted out, let us have a look at some of the exercise that will help you reach your goals.
The PULL-UP (or CHIN-UP) is one hell of an exercise! It needs whole-body strength and coordination - not to mention - a big heart to get through a set of 20 body weight reps.
GOOD THING about the pull-up - uses a lot of muscle, so you stand to gain a lot by putting pull-ups in your exercise program.
BAD THING? Well, You won't master pull-ups overnight!
However, don't let that dampen your spirits; because once you get it right, it can build strength and power (in the whole body, really) in a hurry.
If you struggle with the pull-up initially, it is always a good idea to start with the chin-up - close, underhand grip - as shown in the slide. This is a far easier movement than the standard pull-up where you grip the bar wide and your hands go over the bar.
I recommend a few rules to follow if you want to master the pull-up in a canter! Here goes:
1. Full range of movement: hang down totally and initiate the movement from the bottom and keep pulling till you can see over the bar. The importance of whole range of motion in getting the pull-up...
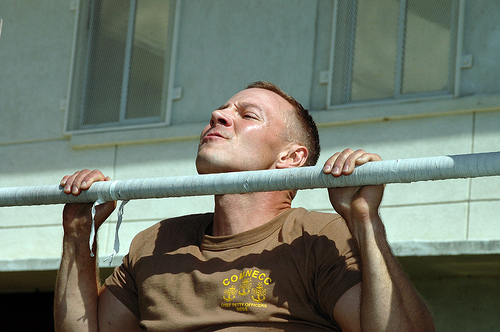
The PULL-UP (or CHIN-UP) is one hell of an exercise! It needs whole-body strength and coordination - not to mention - a big heart to get through a set of 20 body weight reps.
GOOD THING about the pull-up - uses a lot of muscle, so you stand to gain a lot by putting pull-ups in your exercise program.
BAD THING? Well, You won't master pull-ups overnight!
However, don't let that dampen your spirits; because once you get it right, it can build strength and power (in the whole body, really) in a hurry.
If you struggle with the pull-up initially, it is always a good idea to start with the chin-up - close, underhand grip - as shown in the slide. This is a far easier movement than the standard pull-up where you grip the bar wide and your hands go over the bar.
I recommend a few rules to follow if you want to master the pull-up in a canter! Here goes:
1. Full range of movement: hang down totally and initiate the movement from the bottom and keep pulling till you can see over the bar. The importance of whole range of motion in getting the pull-up right cannot be stressed enough.
2. Build up on repetitions - even if you are able to do 1 rep, that's fine. Have a plan to complete 10 reps in 10 sets (1 rep in each set). Then try to finish those 10 reps in lesser sets every time you hit the pull-up bar. For instance, 2 reps in set 1, and then 1 rep for subsequent 8 sets for a total of 10 reps and so on...
3. Use momentum initially when you struggle to finish the repetition - however, remember, we are working towards strict pull-ups, done slowly. Somewhere along the line when you feel you are doing too many reps using momentum, you can cut down on the repetitions and work on 'going slow'.
4. If you still can't do a single rep - even with the use of momentum - use resistance bands. These come in different strengths so you can choose the stronger ones if you are too weak. A word of caution though - the moment you are able to do a single rep without the bands, reduce the use of bands and work on building your own strength
If you never knew - the vertical jump is considered one of the best tests to judge a person's athletic ability. Why? Because to jump higher you need more muscle power - not only in the lower body but the whole body. Muscle power comes from converting muscle strength into speed and power. No use just having huge and strong quads (or other large chunks of muscle like your upper back) if you can't contract them forcefully and quickly. A vertical jump epitomizes how strong your muscles are and how quickly you can contract them.
Jumps are a part of the plyometric training that is so crucial for playing elite level sport. Although, there are 100s of plyo exercises out there, jumps are one of the most crucial when it comes to improving fitness. Training to jump higher and longer helps improve performance in almost all sport - whether short and brutal like sprinting or boxing or endurance sports like long distance running and cycling. In a nutshell, it increases fitness levels needed for all kinds of sports.
So, what's in it for me if I don't play sports, you might want to ask? Well, if an activity increases your...
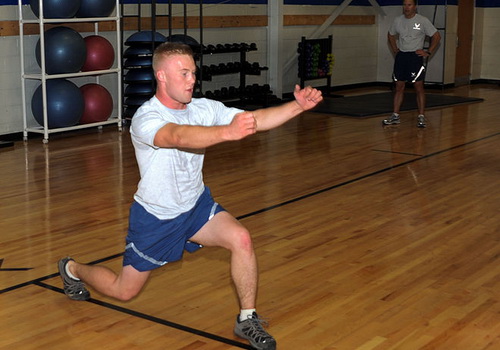
If you never knew - the vertical jump is considered one of the best tests to judge a person's athletic ability. Why? Because to jump higher you need more muscle power - not only in the lower body but the whole body. Muscle power comes from converting muscle strength into speed and power. No use just having huge and strong quads (or other large chunks of muscle like your upper back) if you can't contract them forcefully and quickly. A vertical jump epitomizes how strong your muscles are and how quickly you can contract them.
Jumps are a part of the plyometric training that is so crucial for playing elite level sport. Although, there are 100s of plyo exercises out there, jumps are one of the most crucial when it comes to improving fitness. Training to jump higher and longer helps improve performance in almost all sport - whether short and brutal like sprinting or boxing or endurance sports like long distance running and cycling. In a nutshell, it increases fitness levels needed for all kinds of sports.
So, what's in it for me if I don't play sports, you might want to ask? Well, if an activity increases your fitness levels, chances are, it is burning fat as well. End result - you will not only end up feeling good but looking good as well!
Here are some drills for jump training:
1. BOX JUMPS - A box jump would consist of jumping with both feet onto a box/ bench. You can step down and then jump again. As you get used to the movement, you can gradually increase the intensity by jumping on and off without spending too much time in contact with the ground.
You can also use simple stairs or an aerobic box for these. If you want more progression with height, you can buy a set of plyo boxes.
2. LONG JUMPS - These are similar to box jumps but here you are dealing with covering distance rather than height. Measure out the initial distance that you can jump (both feet together) on day 1 and gradually build on increasing the distance.
3. ONE-LEGGED BOUNDS - Similar to long jumps - however, here you jump with one leg. You can also do a series of one-legged bounds. This will help you increase stride length - comes in handy when sprinting or in distance running.
4. STAIR JUMPS - This is a cross between box jumps and long jumps. Here, we deal with height as well as distance. Cover 2 to 3 stairs with every jump and increase the number of stairs over time.
To increase the intensity of jump training, you can either:
A. Increase the height or distance
B. Increase the number of reps
C. Increase the rate (1 jump per 4 seconds... per 3 seconds and so on)
D. Alternate between exercises - for instance 100 reps of jump ropes and then 10 reps of box jumps
Another exercise that will help you reap similar benefits is the JUMP LUNGES. Read more about it in the next slide.
Jump lunges are another of the great plyometric moves you can't do without. It will not only add athletic ability and improve your fitness levels but burn fat as well. A few of these back-to-back and your heart rate will jump up like it has never done before. So, you'll know you are taking your metabolic rate to where it's never been!
But let's start from the beginning. You can't start doing jump lunges unless you have somewhat mastered lunges; yeah, you guessed it - the jumping lunges are a progression of the normal lunges.
Here's what you need to do:
1. Practice the normal lunges for a few days/weeks - say 10 repetitions on either leg for 4 sets every other session. When you feel you are doing great with the balance, its time to move on to the next level
2. Start with the jump lunges - holding the position of the lunges, hop on both feet without changing the position of the feet
3. Begin with the jump lunges where you swap your feet in midair - here you land with one foot in the front for rep one and the other foot for the next rep
...
Jump lunges are another of the great plyometric moves you can't do without. It will not only add athletic ability and improve your fitness levels but burn fat as well. A few of these back-to-back and your heart rate will jump up like it has never done before. So, you'll know you are taking your metabolic rate to where it's never been!
But let's start from the beginning. You can't start doing jump lunges unless you have somewhat mastered lunges; yeah, you guessed it - the jumping lunges are a progression of the normal lunges.
Here's what you need to do:
1. Practice the normal lunges for a few days/weeks - say 10 repetitions on either leg for 4 sets every other session. When you feel you are doing great with the balance, its time to move on to the next level
2. Start with the jump lunges - holding the position of the lunges, hop on both feet without changing the position of the feet
3. Begin with the jump lunges where you swap your feet in midair - here you land with one foot in the front for rep one and the other foot for the next rep
4. To increase intensity, you can increase the number of reps and/or the rate at which you do them
You've heard about the plank. But, what's a dynamic plank?
Well, a dynamic plank in nothing but a plank with a bit of instability thrown in. Yeah, that's right, it a progression on the plank. However, before you move on to the dynamic plank, you'd need to get strong in the plank first.
Here's how you build up on the plank:
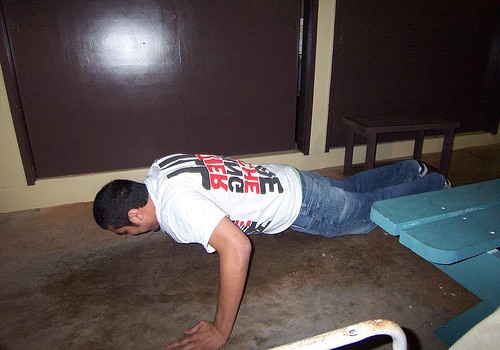
1. practice the plank (on the floor) everyday or every other day
2. 3 sets of as long as you can hold the plank - with a 30 sec rest in between the sets
3. build up on the time - if you are able to hold on for more than, say, 3 minutes, its time to move on to the dynamic plank
How do you do the dynamic plank?
Equipment required: a stability ball (a BOSU ball, a medicine ball, wobble board or any uneven wobbly surface will also do)
Stance: keeping feet together or slightly apart, place your hands on the stability ball (as shown in the picture). Bending your elbows at right angles with elbows bang underneath your shoulders will help you stay in the plank longer. You can also keep you arms straight (as in...
You've heard about the plank. But, what's a dynamic plank?
Well, a dynamic plank in nothing but a plank with a bit of instability thrown in. Yeah, that's right, it a progression on the plank. However, before you move on to the dynamic plank, you'd need to get strong in the plank first.
Here's how you build up on the plank:
1. practice the plank (on the floor) everyday or every other day
2. 3 sets of as long as you can hold the plank - with a 30 sec rest in between the sets
3. build up on the time - if you are able to hold on for more than, say, 3 minutes, its time to move on to the dynamic plank
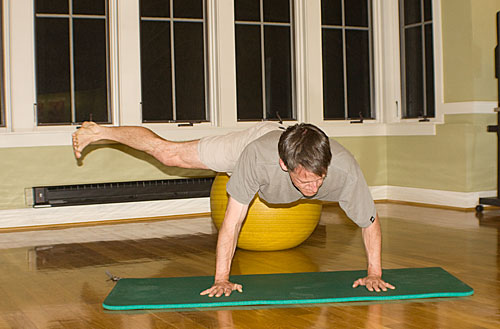
How do you do the dynamic plank?
Equipment required: a stability ball (a BOSU ball, a medicine ball, wobble board or any uneven wobbly surface will also do)
Stance: keeping feet together or slightly apart, place your hands on the stability ball (as shown in the picture). Bending your elbows at right angles with elbows bang underneath your shoulders will help you stay in the plank longer. You can also keep you arms straight (as in the starting position of the press-up).
Remember to form a straight line from your ankles to the shoulders; do not stick out your hips or let them sag too low.
Hold the plank as long as possible, resisting the unsteadiness of the wobbly surface. Breathing normally while flexing your tummy muscles will hold the key.
Muscles worked - muscles of the core including rectus abdominis, the external and internal obliques, the intercostals and the erector spinae. Additionally, the rest of the body musculature also goes through an intense isometric contraction.
Dynamic planks are helpful in forceful activities like sprinting, throwing a punch and lifting weights. Moreover, since it leads to a strong core, you'd be bidding back pain a farewell...
Back pain is bad news - it can sometimes take years to treat.
Also, it it quite common; almost everyone through the duration of their lives suffers from some degree of back pain !
One of the commonest complaints that doctors come across is back pain (Deyo, Mirza, & Martin, 2006). It is a frequent cause of work-related disabilities (not to mention absenteeism in young professionals) (Deyo & Weinstein, 2001).
What's more, the health care bills to deal with back pain run in billions; according to an estimate, the US government, in 2005, spent a whopping $100 billion to deal with the ill-effects of back pain (Katz, 2006).
Those figures mean that back pain isn't bad just for you as an individual but the economy and society as a whole!
Aren't those reasons enough to sort out your back pain?!
The good news is that almost all cases of back pain can be sorted out just by exercising. A strong musculo-skeletal framework will mean you are more likely to have better postures (Sohn, Lee & Song, 2013). Result - better biomechanics when you sit in your chair for hours on end, when you stand, walk, run or exercise. Better biomechanics...
Back pain is bad news - it can sometimes take years to treat.
Also, it it quite common; almost everyone through the duration of their lives suffers from some degree of back pain !
One of the commonest complaints that doctors come across is back pain (Deyo, Mirza, & Martin, 2006). It is a frequent cause of work-related disabilities (not to mention absenteeism in young professionals) (Deyo & Weinstein, 2001).
What's more, the health care bills to deal with back pain run in billions; according to an estimate, the US government, in 2005, spent a whopping $100 billion to deal with the ill-effects of back pain (Katz, 2006).
Those figures mean that back pain isn't bad just for you as an individual but the economy and society as a whole!
Aren't those reasons enough to sort out your back pain?!
The good news is that almost all cases of back pain can be sorted out just by exercising. A strong musculo-skeletal framework will mean you are more likely to have better postures (Sohn, Lee & Song, 2013). Result - better biomechanics when you sit in your chair for hours on end, when you stand, walk, run or exercise. Better biomechanics, in turn, reduce the risk of injuries!
Exercises that will help you fix your back pain in a jiffy are:
1. Planks (normal or dynamic)
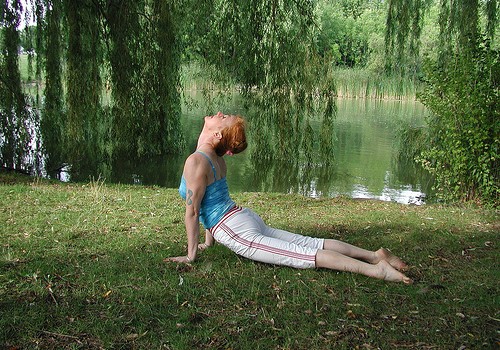
2. Cobra stretches (yoga)
3. Supermans
4. Lower back and hamstrings stretches - dynamic
Let us have a look at one of these - the dynamic plank - in the next slide.
Deyo, R. A., Mirza, S. K., & Martin, B. I. (2006). Back pain prevalence and visit rates: estimates from U.S. national surveys, 2002. Spine (Phila Pa 1976.), 31, 2724-2727
Deyo, R. A. & Weinstein, J. N. (2001). Low back pain. N Engl J Med, 344, 363-370
Katz, J. N. (2006). Lumbar disc disorders and low-back pain: socioeconomic factors and consequences. J Bone Joint Surg Am, 88 Suppl 2, 21-24
Sohn, M. K., Lee, S. S., & Song, H. T. (2013). Effects of acute low back pain on postural control. Ann Rehabil.Med, 37, 17-25.
How Many Reps And Sets?
Right... Now, that we've got fair idea of what needs to be done if you are training at home, there's just one thing that you need to be wary of.
DO NOT start with a bang... Always try to learn the exercises before your really start pushing yourself. I would suggest learning a new movement every other session. During the learning mode, do not attempt to do more than 6 reps per set.
Let's take lunges for instance, a lot many people do a lot many reps and sets. But even after months (hell, even years) they aren't quite sure about their balance when doing these. It makes more sense to get the movement right so you feel it in the right areas.
Once you are confident of the movement, increase the number of reps to about 10-12 per set. When you have the feeling you can put in more reps in a set, it's time to move on to a plyometric move like jump lunges. Similarly, after you've somewhat mastered the bodyweight squat, you can move on to jump squats.
In a nutshell:
1. Learn the basics of the exercise - balance, coordination and feeling it in the right...
Right... Now, that we've got fair idea of what needs to be done if you are training at home, there's just one thing that you need to be wary of.
DO NOT start with a bang... Always try to learn the exercises before your really start pushing yourself. I would suggest learning a new movement every other session. During the learning mode, do not attempt to do more than 6 reps per set.
Let's take lunges for instance, a lot many people do a lot many reps and sets. But even after months (hell, even years) they aren't quite sure about their balance when doing these. It makes more sense to get the movement right so you feel it in the right areas.
Once you are confident of the movement, increase the number of reps to about 10-12 per set. When you have the feeling you can put in more reps in a set, it's time to move on to a plyometric move like jump lunges. Similarly, after you've somewhat mastered the bodyweight squat, you can move on to jump squats.
In a nutshell:
1. Learn the basics of the exercise - balance, coordination and feeling it in the right places
2. Build up to 12 reps per set - series of 4 to 6 sets
3. Increase intensity by putting in a plyometric component
In summary, working out at home can be as effective (if not more) as training at the gym. It especially helps if you got your fitness goals, exercise program and motivation levels sorted out .
So, stop wasting your time thinking about which gym to join and start hitting your backyard with a plan!
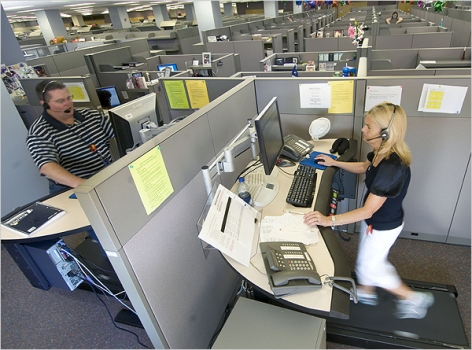
Having a desk job, as we all know, can send your efforts of staying active for a toss! However, all cannot be lost! Here are some ways in which you can stay active at your place of work:
1. Get up and move about as often as you can.
2. Keep snacks down to minimum, up the black coffee
3. Walk down to the get water ever so often - the acts of walking as well as getting water in your system will bump up metabolism
4. And, the usual stuff like taking the stairs - however, if you are fit enough and don't run out of breath after taking the stairs, I'd suggest, you jog up the stairs!
What good can these things do for me, you might want to ask? They sound too easy to be of any real benefit! However, before you chuck these out of the window, try them.You'd be surprised how much these simple measures can make you feel a hell lot more energetic around your place of work.
What's more, staying active this way will easily help you burn a couple of hundred calories more!

Your thoughts on this
Loading...